Azure SQL Database configuration — Standard DTU vs vCore Provisioned vs vCore Serverless
For this blog post I am hoping to give a better idea of what are the different options you have for your database creation. I faced this type of question when I was trying to figure out what configuration is best, what type of configuration would be best for which type of workloads, and some of the pros and cons that each database configuration can cause.
Before continuing I did want to specify that when we speak about configuration I am talking about resources assigned to the Azure SQL DB (I will shorten Azure SQL Database to DB for this blog post). When talking about resources I mean the compute and storage configuration.
As a primer, when we talk about compute when Azure SQL DB was initially rolled out we mean DTU (Database Transaction Unit). A DTU can be thought of CPUs, however a more accurate description would be that a single DTU is made of CPUs, Memory, and I/O performance improvement.
Traditionally Azure SQL DB provided compute and storage are together. So for example if you wanted to have more storage then you would have to upgrade your DTUs (the original compute units). So for example if you wanted to have more storage then you would have to upgrade your DTUs (the original compute units).
The next generation of Azure SQL DBs included two additional services tiers: Provisioned and Serverless. Provision is similar to the old DTU model, however this process separates out compute and storage by being able to select a vCore (which deals with just compute) and storage seperately vs being bundled toegher. Serverless goes a step further and introduces a scaling model to the Azure SQL DB where you select minimum node and max number of nodes and then as the workload increases so does the number of vCores allocated to the Azure SQL DB. Serverless also provides the ability to select your storage separately as well.
Lets take a look at each one and their pros and cons.
Azure SQL Database Service Tiers
As mentioned before when we are talking about Azure SQL DB service tiers we are talking about the following:
- DTUs
- Provisioned
- Serverless
For you to be able to view those options you can either choose them during database creation, or change it once your database has been created. In either case you can always change the database configuration at any time, and as long as you don’t choose the size of your database that is less than the amount of data that you have stored then you should not face any issues.
A word of caution on billing. Out of the 3 options DTU and Provisioned charge your account on a monthly basis. So as soon as you change your configuration you will start inuring a charge.
For example, a database that has 100 DTUs will cost you 281.58$ a month.

So what this means is that your daily bill would be that amount divided by X number of days in a billing cycle. So if you spun this up on Sept 1st, then the amount in divided up for the whole month.
Provisioned works the same where its a monthly cost. Serverless however works by only charging you per second your database runs times on the number of nodes that you have selected. So if your max node amount is 4 and it costs 0.00045$ per second then your total would be 0.00045$ * 4.
To be able to change your configuration all you need to do is go to the Azure Portal and type in Databases. Then select the database that you have already created. From there scroll down on the left hand panel to see the “Configure” button:

From there you should see the configuration screen and all the options that you have available to you.

DTU Service Tier
The DTU service tier can be accessed by clicking on the top left tab in the configuration screen called “Looking for Basic, Standard, Premium?”.
Once you click on that you will be treated to the DTU menu and you can select from the three different grades:
- Basic
- Standard
- Premium

The main differences between the three is the the max amount of storage and compute you will be able to assign to your database.
For example lets take Basic. Basic is the lowest tier of the DTU service and consequently has very limited options in how much compute and storage you can select:

Per the picture above the max number of DTUs you can select is 5 (which is there by default and can’t be changed) and the max number of storage you can assign is 2 GB.
This type of select is good if you are doing a home lab or just need a database to do small experiments or individual learning. This also means that you would paying a very small amount for this on a monthly basis. From the screenshot about this would cost you about 5$ a month.
While this is good for personal use you won’t really be using this on a dev environment where you are expected to run multiple workloads. For that you would move the next tier called Standard.

With Standard you have a much larger choice of how many DTUs you want to assign, from a low of 10 to a max number of 3000. Pay attention the the bottom left box that shows the estimated cost. This will update as soon as you start moving the top slider to the right. The more you move it to the right then more DTUs you are assigning to your database.
Another thing to keep in mind is that the storage account. If you stay under 50 DTUs then you are limited to 250 GB of storage for your database. However, as soon as you move to 100 DTUs then you can go up to 1TB of space.
That is why in the DTU model the storage and compute are linked. To be able to store more than 250 GB of storage you must at least have 100 DTUs or more.
Finally the last level available is called “Premium”. It functions the same way as the Standard and Basic where you select the DTUs and Storage levels, but the main difference is the improvement in I/O throughput and a reduction in I/O latency.
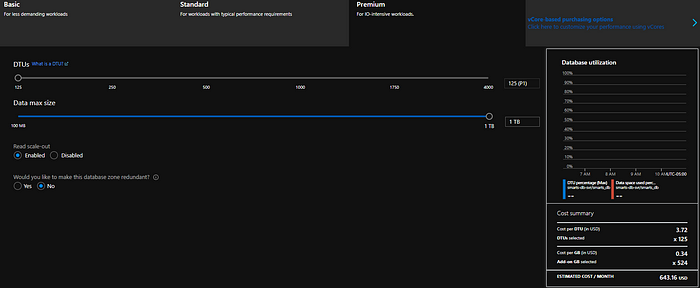
You will however pay for that increase where the lowest tier of Premium costs 643$ a month. This is usually for production critical process.
The other benefits is that Premium offers you to offload read only queries and thus not impact performance if you are also writing data into this database. More information on it can be found in the following article from Microsoft: Use read-only replicas to offload read-only query workloads.
Lastly if you are worried about data redundancy Premium offers the ability to have the data to be written into a different zone within a region just to make sure that if one zone goes down that your data is still available.
A good way to summarize the differences between the three DTU tiers can be found on the Microsoft website “Compare the DTU-based service tiers”

For me if I was faced with decision which DTU to start with I would start with Standard and 10 DTUs to start out with. The reason for this is that 10 DTUs on standard give you about 250 GBs to play with and only cost about 15$ a month. After doing some testing its always easy to add more resources to it. The other benefit is that these services are 100% provisioned and almost always available.
Provisioned (vCore model) service tier
Recently Microsoft released a different service and pricing structure to replace the DTU model. The name of that mode is vCores and its divided into two different parts: Provisioned and Serverless.
The main difference between vCore and DTUs is that vCores provide better compute, memory, I/O, and storage limits. Another change is that unlike with DTUs you can choose how many vCores you want to assign to your database without worrying about how much storage that database can handle.
So for example you can have 2 vCores and 1 TB database:

Or you could go the other way around and have 80 vCores and then only have 1 GB worth of database space:

If you noticed from the screenshot the price of those vCores are very high. Ever at 2 vCores you are looking at a bill of 528$ a month. The reason again is that vCores are more efficient and more powerful than DTUs. The other resaon is that if you notice there is an option called “Hardware Configuration”.
Hardware Configuration allows you to choose what time of config you need. Some are better for CPU intensive workloads while others are designed more for memory intensive workloads. By clicking on it you can select the different options available to you:

To see the full list of different configurations you can follow the pricing page on Microsoft that explains what configurations are available, what they cost, and if they need to be business critical for you to be able to use them: Explore all SQL Database pricing options.
For most workloads if you have it set to default, which is Gen5, then you should be able to handle most use cases.
As with DTU pricing you simple move the slider from left to right (same for storage) and then you are set with a database that is provisioned for you 100% of the time.
The last option for Provisioned is the “Business Critical” tier. This functions the same way as the Premium DTU and is only available for provisioned (not Serverless). The main reason to choose this is to reduce latency.

In addition this tier also offers the “Read scale-out” and zone redundancy as with Premium DTU while letting the user decide how many vCores while removing most of the database size restrictions. Where as to get 250GBs you need at least 100 DTUs in Provisioned your starting limit is 1TB and can go up to 4TB if you increase your vCores to at least 32 vCores.
To read more about the Provisioned vCore please read the following Microsoft document: “vCore model overview — Azure SQL Database and Azure SQL Managed Instance”. The following document gives a good overview of the vCore set up, its uses, and also different types of configurations.
Provisioned (vCore model) Hyperscale tier
The other option available in the Provisioned tier is “Hyperscale”. This one is interesting because it functions that same way as provisioned tier, but the main difference is that you don’t have to worry about the side of your database. As your data grows, the most space will be available and you will be charged for the amount of space that you use up.

You still have to select the number of vCores (thus this will be the main cost), but what is interesting is that this tier also offers the ability of having replicas similar in the the Premium DTU tier. Basically you can determine the number of replicas you want and just like in the Premium DTU it will allow read only queries to go through those replicas while preserving the read/write query performance. The more you add the more read queries it can handle without impacting read/write performance.
So if you have a use case where you have at least 4TB of space and you need a fast Database in the cloud then Hyperscale might be the solution for you.
To read more about Hyperscale please read the following Microsoft document: “Hyperscale service tier”.
Serverless tier
The other option that Microsoft introduced in their Azure SQL DB offering is the ability to have a Serverless database. This is similar to how BigQuery works where you only pay for the amount of seconds that your query runs.
To set it up you go back to the Configure page and then select the “Serverless” box. The main difference between Serverless and Provisioned/DTU tiers is that in this case you are selecting the minimum amount of nodes that you want and the maximum number of nodes that you want:

So the way that the above configuration works is that when ever a workload is sent to this database it will start with 1vCore. When it detects that this 1vCore is working at maximum capacity, it will then add a second vCore. This process repeats until it reached the maximum amount of vCores, which is 4 in the above screen shot.
Note: when talking about billing per second Azure calls this vCore seconds.
The process also works in reverse. If for example you have those 4 vCores and then it detects that the usage is below a certain threshold then it will reduce the number of cores from 4 to 3, and so on until it hits your min number of cores.
As for billing you can see that each second charges you 0.000145 USD. That is then multiplied by the number of cores that you have running. So if you have 4 cores then its (0.000145 * 4) * number of seconds that the job runs.
In addition to billing you also have the option of pausing the database when its not being used which means that you will only pay for the database storage and not for the compute.

But wait you say, why am I paying for compute if the whole point of Serverless is that it only charges me for the during of query that I run times the number of nodes? Wouldn’t this mean that I won’t get charged during after hours if I never pause my database?
So this is where it can get a little confusing. If you have a Serverless database and it is never paused, then you will have a minimum charge. That minimum charge is based on the minimum number of nodes that you have selected and its memory.
Lets take an example where we have a Serverless database we inactive for about 6 hours after it ran its workload. Lets also say that the minimum node for this set up is 1 vCore.
What you will need to do is calculate the number of seconds that those 6 hours make up. So that would be 6 * 60 * 60 = 21600 seconds. We then take 21600 and multiple it by 1 which equals to 21600 vCore seconds that is then multiplied by 0.000145 USD.
The point is that while Azure SQL DB is trying to go toward the same pricing as BigQuery there is still a catch that if you are not using that database then you have to convert all of the time that its not being used in seconds and then multiple that by number of nodes and then the cost you get for running that one node. That is how you can estimate the true bill for using Serverless. Thus its recommended that if you use Serverless to get the true savings of that database you should set up Auto-pause.
What you also need to keep in mind is that waking up the database from Auto-pause will always make your first workload fail (at least in my experience). The reason for this is that it takes a longer time for the database to wake up and some workloads might error out waiting for it. One of the solutions to this could be a retry, but that is something to keep in mind.
Thus with all of that it is recommended that you would use this for your dev environment or places where you have ad-hog querying . Also because it has nodes that are being added and removed you should not have your production workloads running on it. By having those nodes be added and removed it could impact performance where one node is stuck at 100% while waiting until a new one is added.
To read more about Serverless please read the following Microsoft document: “Azure SQL Database serverless”
Summary
I know this was a long post so lets try to summarize what we wrote.
Basically when you are faced with the decision which database configuration you should use you have the following pros and cons.
DTUs
Pros: Easy to understand billing, good for initial workload estimation where you will start with a small workload and scale up.
Cons: Compute and Storage are tied together and are not as flexible when you need more DTUs and smaller amount of space or need less DTUs but more space.
Provisioned
- Pros: Latest vCore technology so performance you get from vCores is better than DTUs. In addition you have more flexibility on how big your database needs to be vs the amount of vCores that you want. You can also choose different vCore configurations depending on type of workloads you are running.
- Cons: more expensive that DTUs
Serverless
- Pros: Can save money if used properly. Have great flexibility in amount of vCores/Storage set up. Perfect for ad-hoc workloads.
- Cons: Pricing is a little confusing and requires in-depth reading on how the cost and performance works. Due to it adding and remove vCore not recommended for production ready workloads.
So all in all if you need a basic database without much thought on cost/performance then I recommend the DTU approach due to its simplicity. If you want more control and better performance, but want to eventually run production workloads then the vCore Provisioned approach is best. If you still want that compute/storage flexibility, but not sure how often you would use that database then you should go with Serverless, but make sure to set it to auto-pause.
Hopefully you found this overview interesting and it helped you make an educated decision on which type of Azure SQL DB configuration would work best for you.
Happy learnings!!!
